Permissions
Company File Storage Access
| Category | Administrator | Manager | Regular user | Collaborator | Guest |
|---|---|---|---|---|---|
| Manage file storage | |||||
| Create folder | |||||
| Upload file | |||||
| Download file | |||||
| Delete file |
Video Meeting Access
| Category | Administrator | Manager | Regular user | Collaborator | Guest |
|---|---|---|---|---|---|
| View meetings | |||||
| Create / Edit meeting | |||||
| Invite / remove meeting |
Department Access
| Category | Administrator | Manager | Regular user | Collaborator | Guest |
|---|---|---|---|---|---|
| Member management | |||||
| Arranging Seats | |||||
| Manage file storage | |||||
| Create folder | |||||
| Delete folder | |||||
| Read file | |||||
| Upload file | |||||
| Download file | |||||
| Delete file | |||||
| Manage Dept. board | |||||
| Read board | |||||
| Write board | |||||
| Write comment | |||||
| Other dept. management |
Lobby Access
| Category | Administrator | Manager | Regular user | Collaborator | Guest |
|---|---|---|---|---|---|
| Manage Notice | |||||
| Write notice | |||||
| Read notice |
Lounge Access
| Category | Administrator | Manager | Regular user | Collaborator | Guest |
|---|---|---|---|---|---|
| Manage board | |||||
| Read board | |||||
| Write board | |||||
| Write comment |
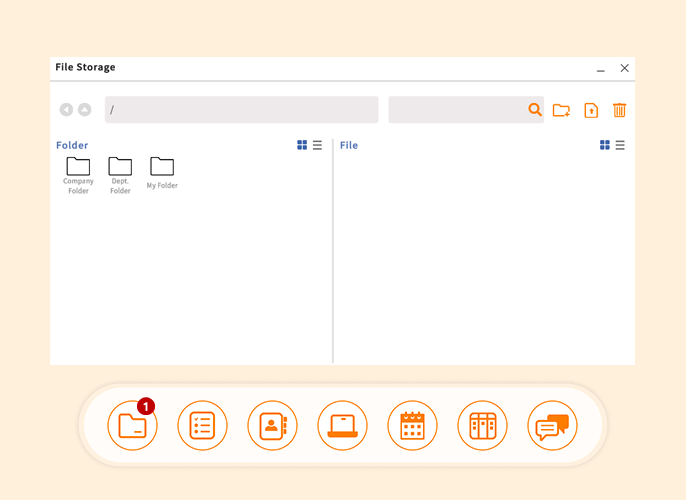
File Storage
There are 3 types of file storages, one is for company, one is for each department, and for individual users. You cannot delete, create new folders, or upload files in the root folder. Right click a file to open, copy, paste, rename, download or delete.
Tip
- You can drag & drop files when you upload from my computer.
- The maximum file upload size is 1 GByte. If you need to upload bigger files, you will need to split the files.
- Joycollab file storage supports Google Drive integration. You can copy from the Google Drive and paste into Joycollab file storage or you can copy from Joycollab and paste it into the Google Drive.
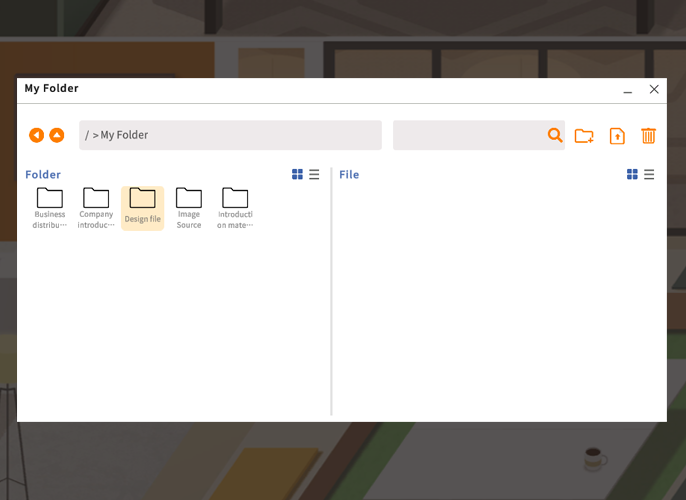
Upload and Create New Folders in a file storage
If you have an access to any file storages, you can create new subfolders under the company folder, department folder, or personal folder. You can upload files to the exiting folders, and you can drag and select to delete files.
Tip
- Sub files will also be deleted if the folder is deleted.
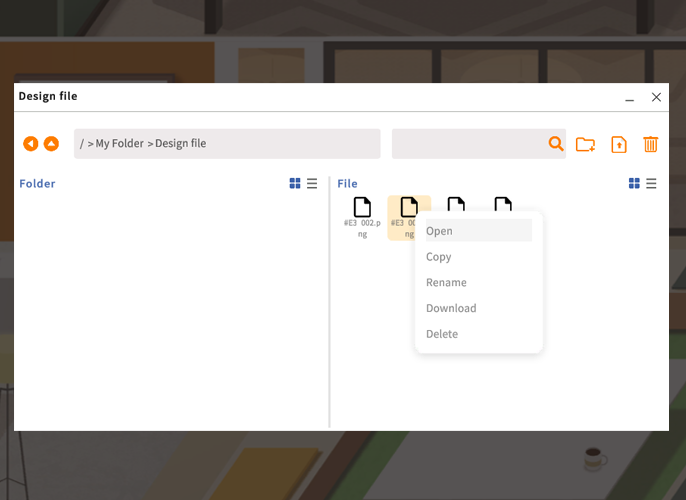
File Storage and File Menu
Right click a file or a folder to open, copy, paste, rename, download or delete.
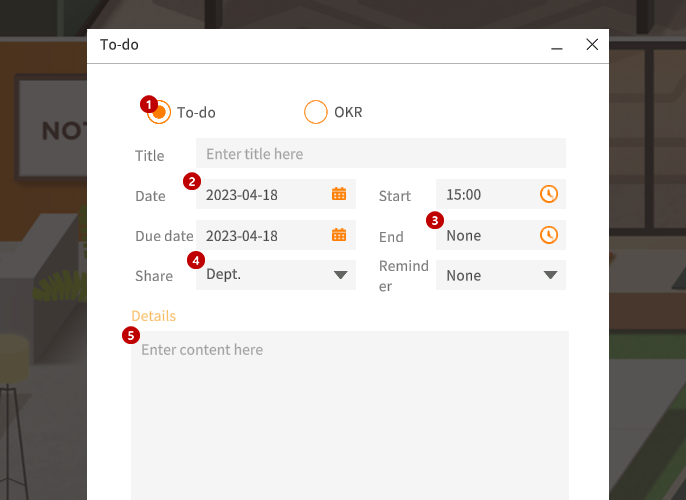
To-do
You can check company tasks, department, and personal to-dos. You can edit, delete your own to-dos. You can delete, edit, or delete to-dos, in your avatar menu.
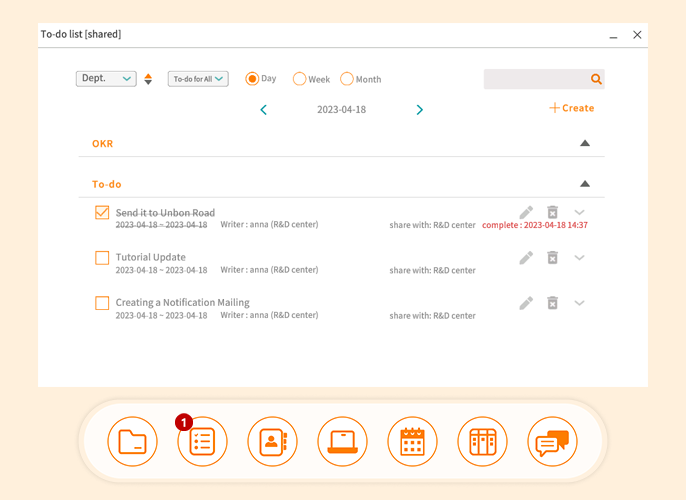
1To-do
Select "To-do".
2Date, Due Date, and Time
You can add a start date, a due date, and time.
3Setting Reminders
You can set a reminder for at least 5 min to maximum 2 hours before the time set.
4Sharing
You can set a sharing range for postings.
Tip
- If you select "Department" the members of the department will be able to check the postings.
- If you select "Company" all members in the workspace will be able to check the postings.
5Details
You can write details about your work.
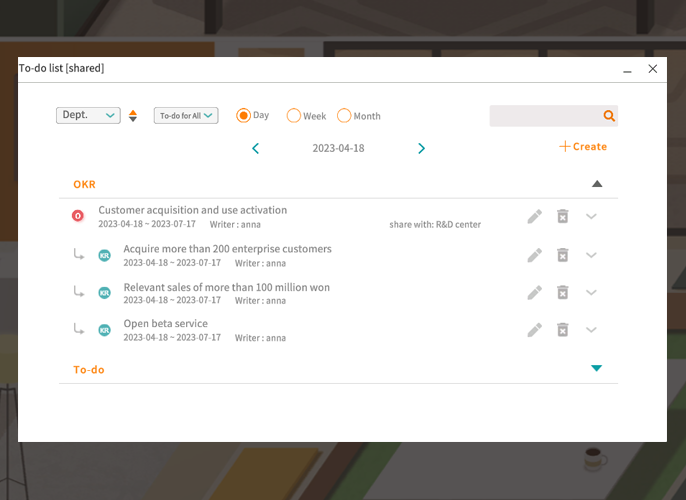
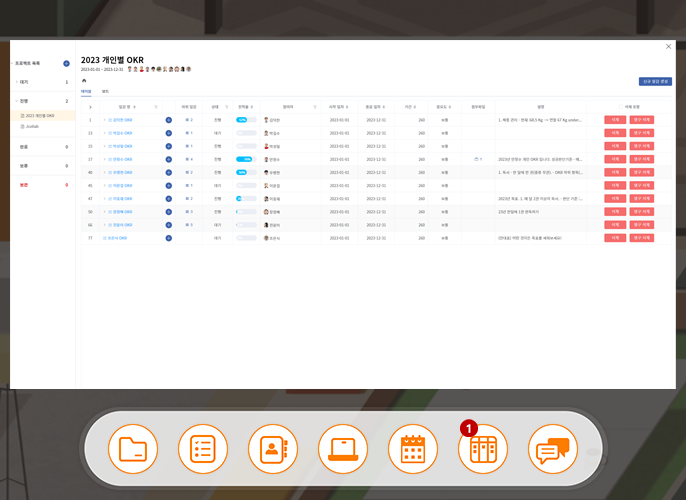
OKR
"O" is for objective, the plans for your goal. "KR" is for Key Result that guides you to achieve goals.
Tip
- Only a manager or above can register a "Company OKR".
- You will not be able to see the OKR if you open the To-do by clicking the right button of your mouse on the avatars.
- OKR can be viewed from the To-do in the floating menu.
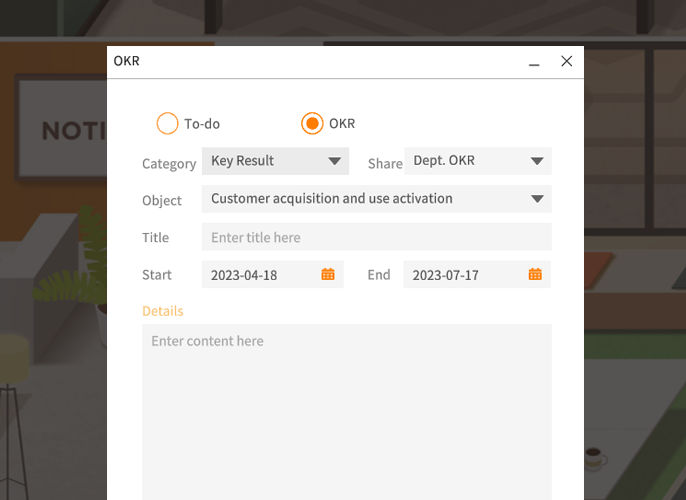
1Type
"Objective" should come first to enter the "Key Result".
Tip
- Only the writer can check and see the own "personal OKR".
- Only the members in the department can check and see the "Department OKR".
- All members can check and see the "Company ORK".
2Start / Finish Date
The start date is set for today.
Tip
- Default finish date for "Objective" is 3 months.
- The default start and finish date for "keyResults" are based on the start and end date for "Objective".
- The date range for "KeyResult" is limited within the date range of "Objective".
5Details
You can enter details for "Objective" or "KeyResult" here.
6Edit OKR
Only the OKRs written by users can edit the title, start date, finish date, and details.
7Details
You can enter details for "Objective" or "KeyResult" here.
8Delete OKR
You can delete only your own "Objective" or "KeyResult".
Tip
- "KeyResults" will be deleted if the "Objective" is deleted
Video Meeting
Create Video Meeting
You can create a meeting by right clicking on the meeting room space. Or you can create a meeting by clicking the meeting room icon on the floating bar at the bottom of your office.
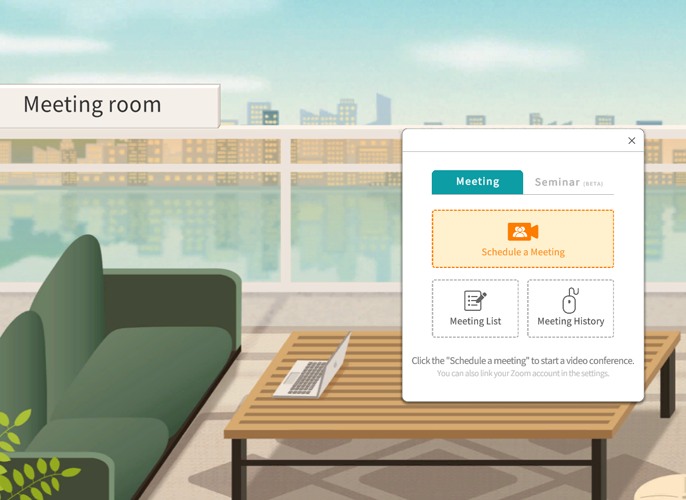
Tip
There are 5 ways to create meetings.
1. Right click on the meeting room space and select "Create Meeting".
2. Right click on the meeting room space and select, "Meeting List" and then "Create new meeting".
3. Click the "Meeting" button on the floating menu bar, then click the "Create new meeting" button.
4. Click avatars that you want to have a meeting with while pressing the Ctrl button. Right-click your mouse and you will see a menu then choose, "Group Meeting". (You can select avatars by dragging.)
5. After selecting all avatars using Ctrl button or dragging, you can now drag them into the meeting room space to create a meeting.
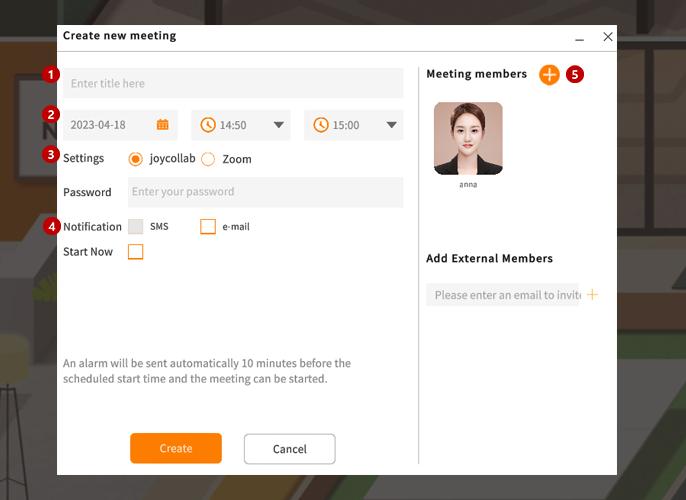
1Enter a title for you meeting
Enter a title for the video meeting.
2Setting a start date and time for a meeting
If you check the "Start Now" check box then a meeting will be created right away. If you set a start, end date and time then a scheduled meeting will be created.
3Setting a Password
You can set a password for your meeting.
Tip
- No Password: An open video meeting will be created.
- With Password: A secure personal video meeting will be created.
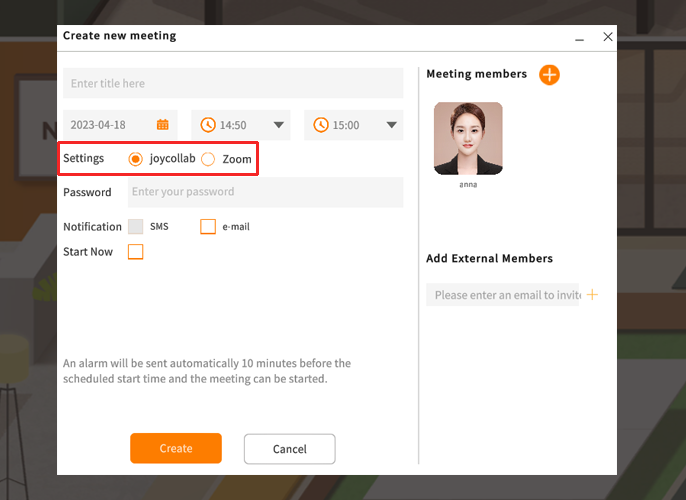
Also, you can select a video meeting platform from Joycollab or Zoom.
Tip
You must integrate your zoom account from the settings before using the Zoom video meeting.
4Meeting Reminders
You can send reminders by selecting text message, email or both.
5Video Meeting Participants
You can add and delete the members to invite.
Tip
You can remove or add more users to the meeting while the meeting is in progress.
Edit Meeting Information
You can change title, start/end date and time.
You can also change reminder, password, and meeting participants.
Tip
- Only who created the meeting can edit the meeting.
- Only scheduled meetings can be modified.
Delete Video Meetings
You can delete a scheduled meeting.
Tip
- You cannot delete an ongoing meeting.
- You can only delete meetings that you have created.
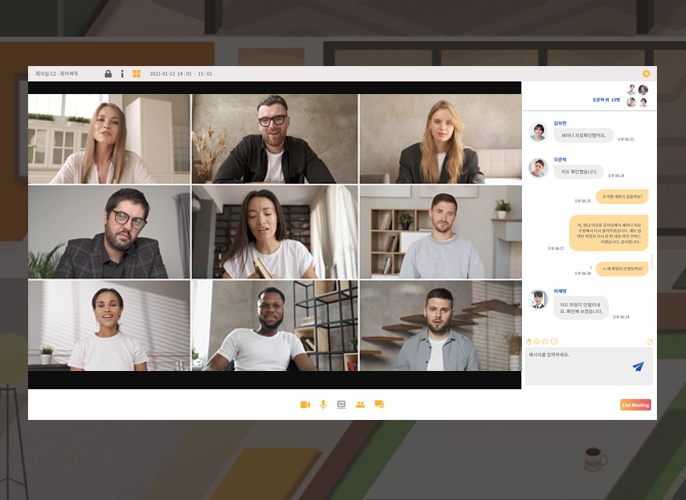
Join a Video Meeting
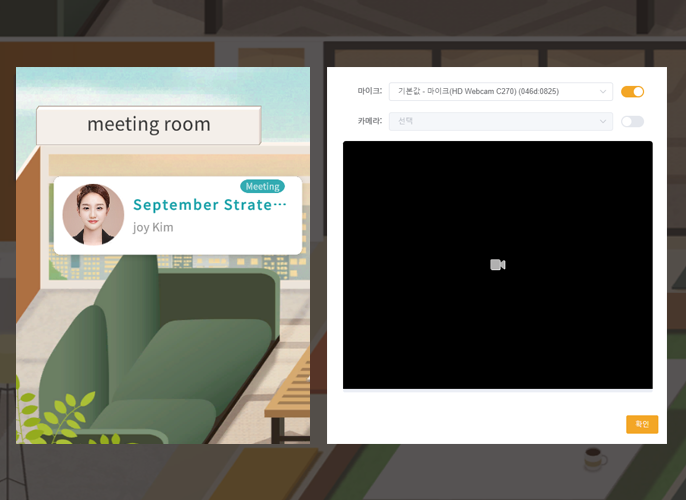
Set up your mic, and screen when entering a meeting.
You can set the size of the meeting window. You can turn ON/OFF your mic or screen. You can chat with the participants who are in the meeting.
1Entering with "Start Now"
You can enter a meeting created with the "Start Now" immediately. You can copy and send URL to the meeting participants.
2Entering a Scheduled Meeting
You can enter a scheduled meeting at the time set. You can copy and send URL to the meeting participants.
3End Meetings
"End Meeting" will end the meeting you are in and also the members in the meeting.
4Leave Meetings
"Leave" does not end the meeting.
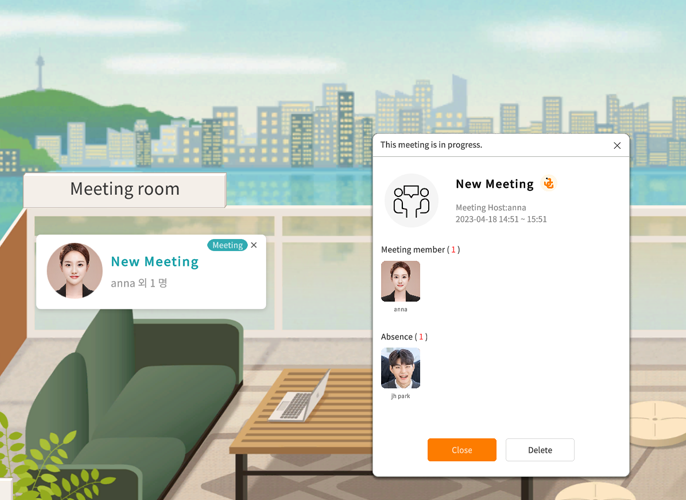
Meeting Room Information
You can check the ongoing and upcoming meetings in the "Meeting List".
Tip
- The meeting disappears automatically when there are no members in the meeting for 10 mins, end the meeting with the clicking the "End" button or when the day passes.
- Only the members who are invited can enter the personal meetings.
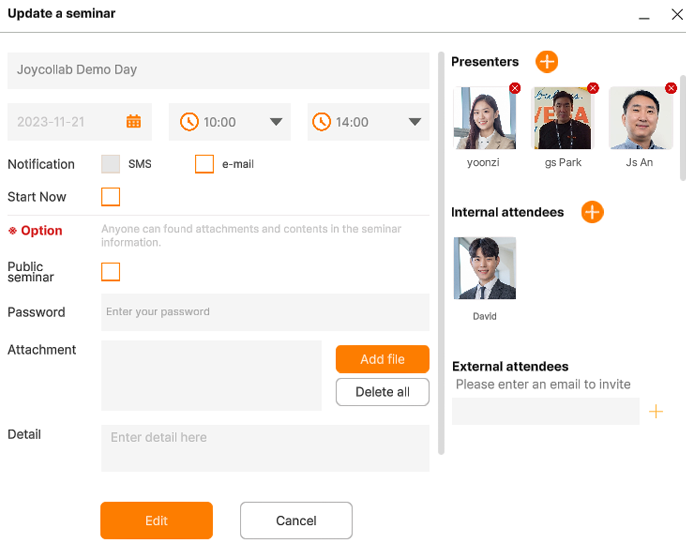
Seminar
Opening of a seminar
You can open it by right clicking on the right mouse in the room space. In addition, click the Seminar tab by clicking the Room icon in the bottom floating bar, You can check the seminar opening and information.

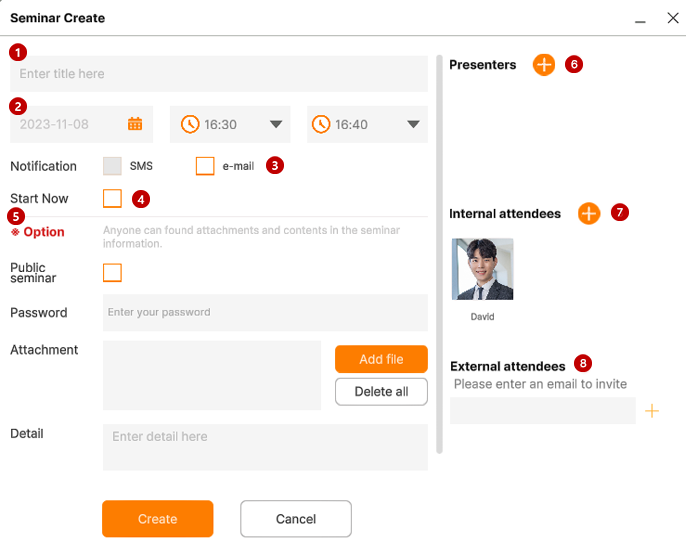
1Adding a seminar title to register
Enter the title of the seminar you want to run.
2Enter date and time
Select the seminar start schedule and time. Select 'Start Now' at the bottom to create the seminar immediately.
3Seminar notification
Send seminar notifications by selecting the necessary means, such as "text" (now not supported), "email", etc.
4Start now
Start the seminar right away.
5Optional
If this is an open seminar, check the box for that part. For private seminars through some attendees, enter a password. The password will be shown when participants are notified by mail. Attach files and add details so that participants can easily and easily check the contents of the seminar.
6Add Presenter
When creating a seminar, the founder can add presenters.
7Internal Participants
You can invite members within your workspace to a seminar and add and delete internal participants.
8an outside participant
Non-members who are not subscribed to the workspace can be invited to the seminar. Participants can enter through the seminar link received via email.
Tip
You can add (invite) and delete (withdraw) new members during the seminar.
Modifying Seminar
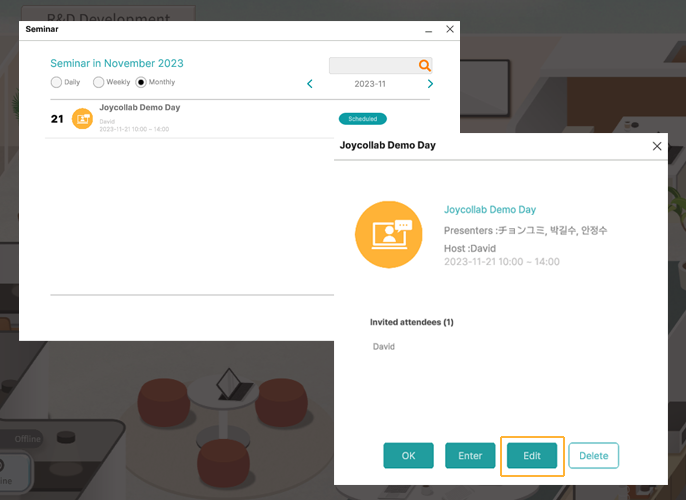
1Check the seminar list
Click Seminar > Seminar Information to view the progress and upcoming seminar list. Click the list of seminars you want to modify.
2Check seminar information
Press the Modify button to check the seminar information you previously entered.
3Modification of Seminar
You can modify "Title", "Start Date", and "End Time". You can change "Seminar Notification", "Password", and "Presenter, Participant".
Tip
- Only seminars that you have registered for can be modified.
- Only the seminar that is scheduled to be held can be modified.
Delete Seminar
Delete the scheduled seminar.
Tip
- Seminar in progress cannot be deleted.
- Only seminars that you have registered for can be deleted.
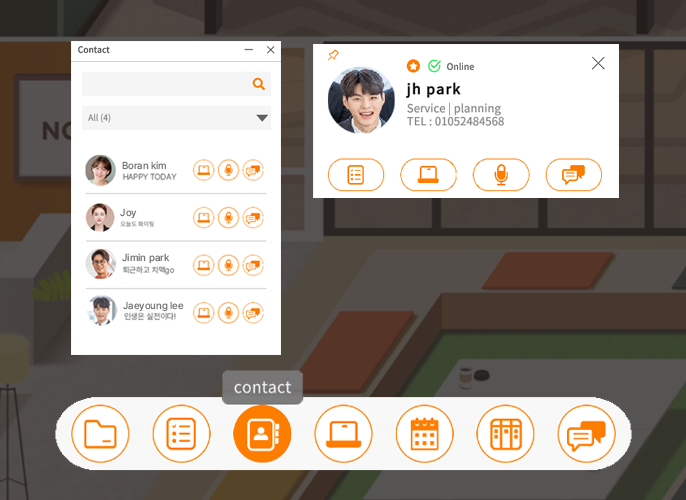
Chat
Chat list
You can see the chat list and the number of unread conversations. You can search chat history and contacts. A chat window will be activated as a tab and can also activate multiple tabs. You can search conversation, upload files and use emoticons in the chat room.
Tip
- You can select an avatar to do a private conversation.
- You can also select multiple users to do a group conversation.
Private Chat
You can use the contact list or the add button to invite others to chat.
You can see the list of chat room members using the Settings menu and you can delete conversations, add members.
Tip
You can leave the chat room using the gear button then the "Leave" button.
Group Chat
You can use the contact list or the add button to invite others.
You can see the list of chat room members using Settings menu and you can delete conversations, add members, and leave the meeting, using the group chat settings.
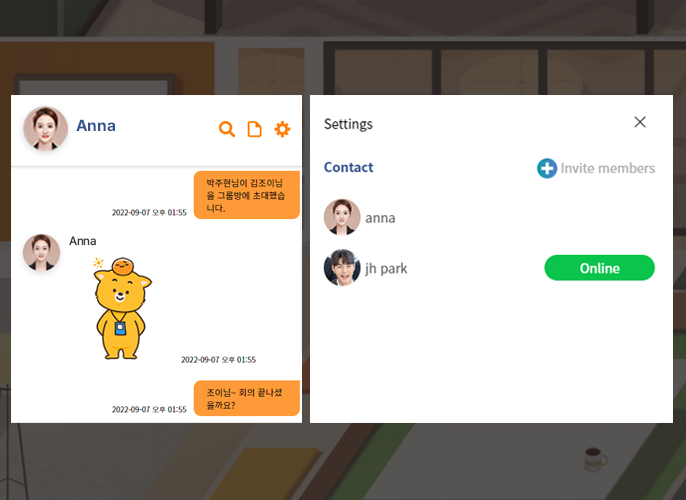
You can share files or use emoticons using the buttons above the chat window.
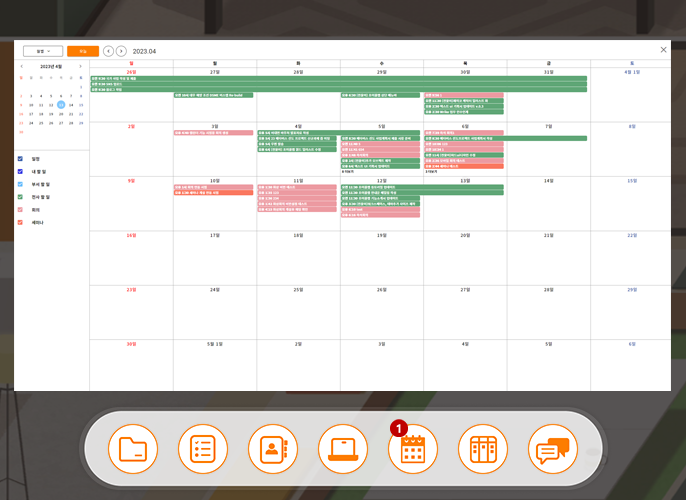
Calendar
Provides a company-wide, departmental, and personalized calendar.
You can share your out-of-office/vacation/meeting registration and schedule at a glance.
Kanban Board
Visualize project progress, prioritize tasks, etc
Visual project management enables real-time work status.
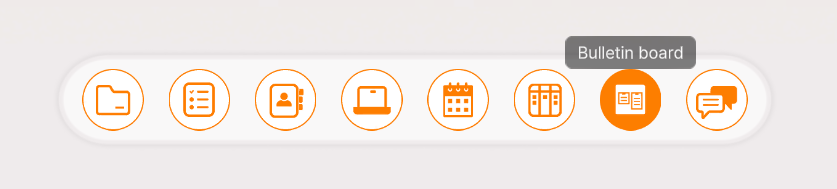
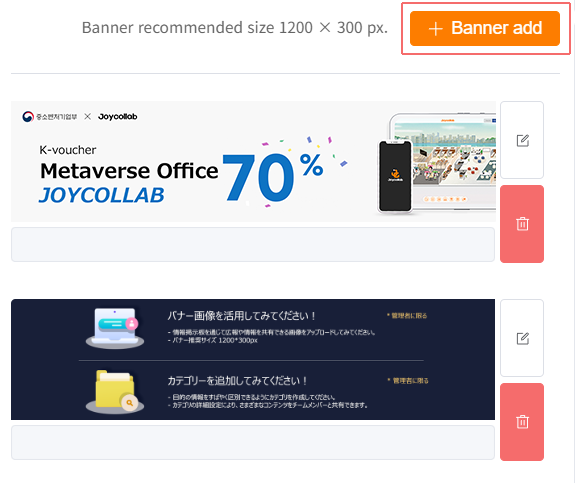
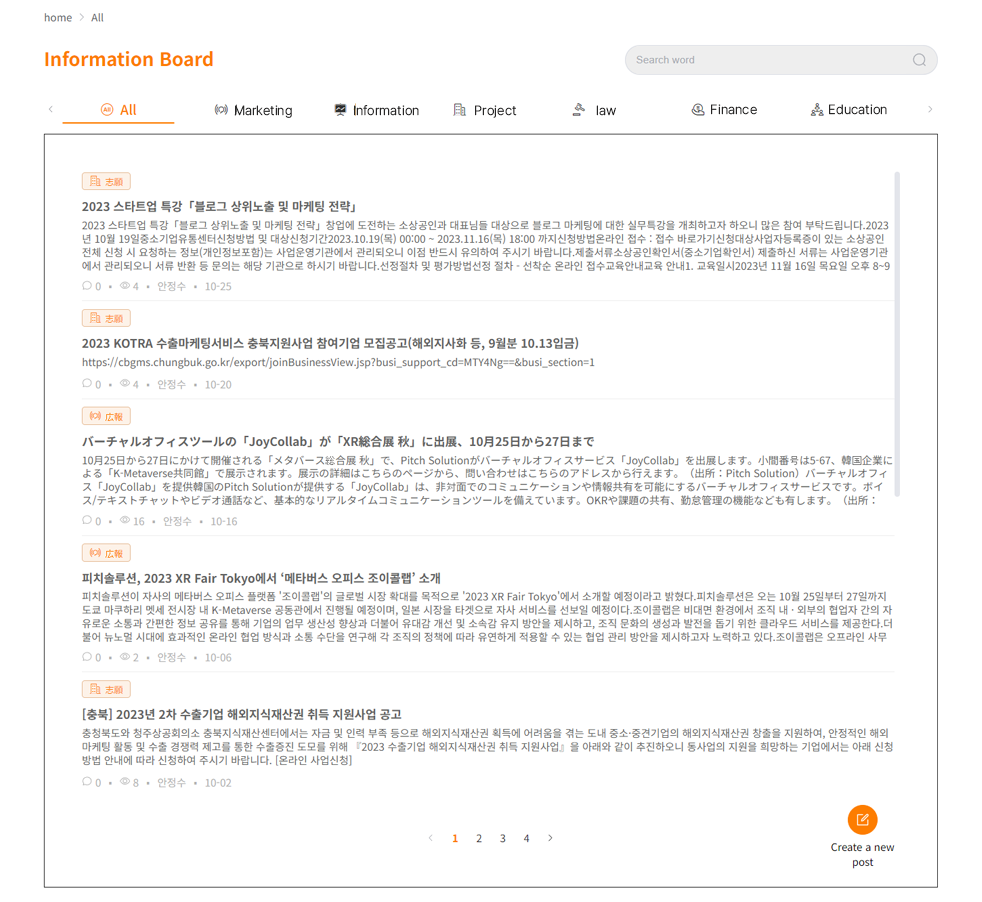
Information board
You can use the Web Bulletin via the "Information Bulletin" button at the bottom of the floating menu. In the main screen area, you can create and share the content you want through the top banner image and the bottom category.
1Banner image
You can upload images through events or promotions on the bulletin board. It also links to a new window.
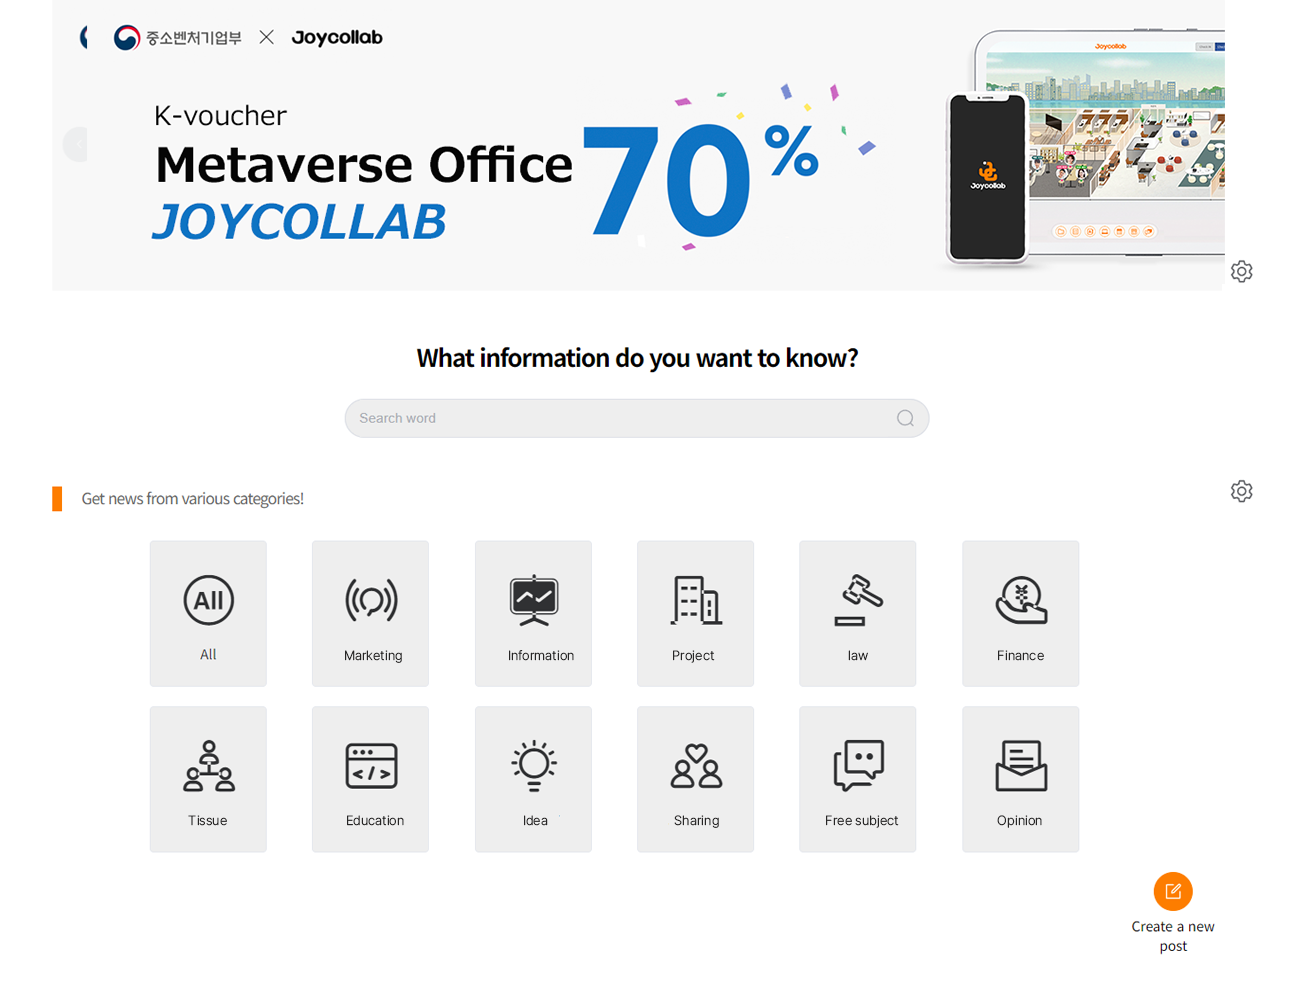
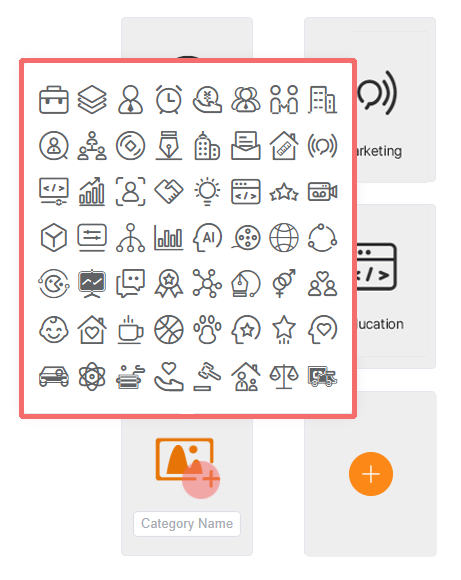
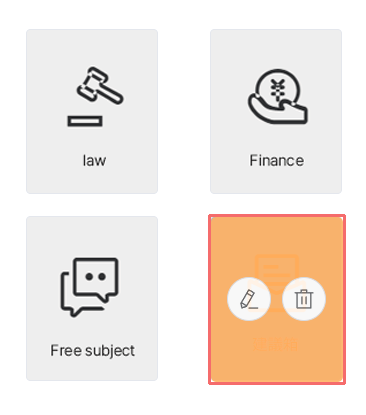
2Category
Categories can be classified by selecting icons to distinguish between various contents. Category names can be modified and deleted. Search within the information board makes it easy to find what you want.
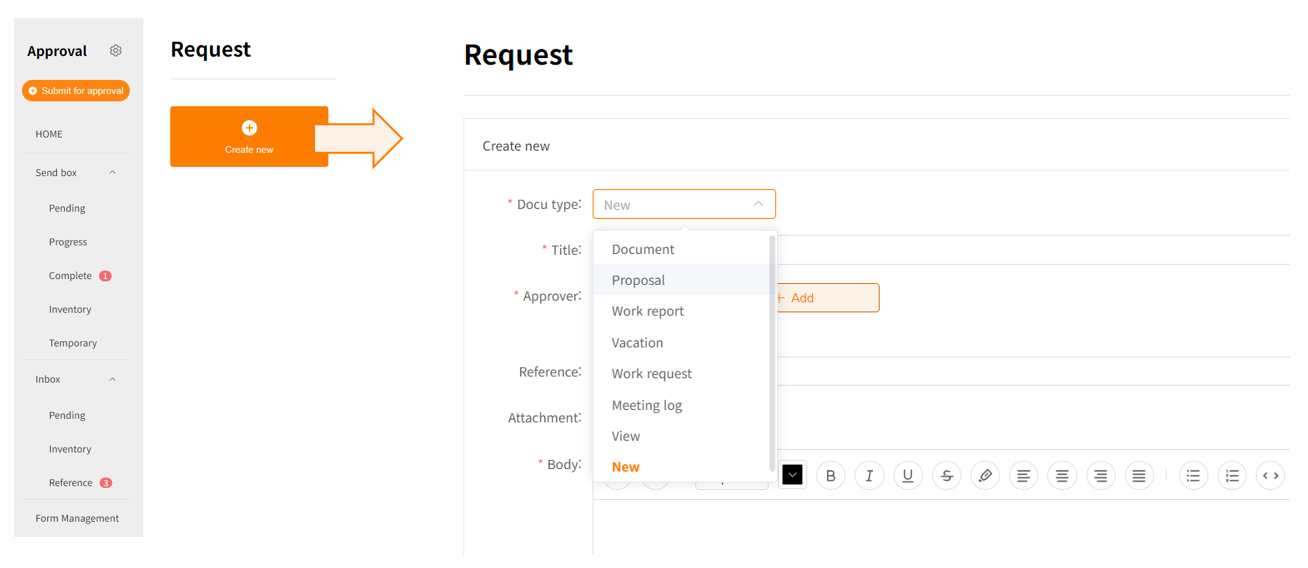
Approval

Approval is an easy-to-use approval tool that can be customized to suit the way each company works, from creating frequently used forms to writing and requesting approval.
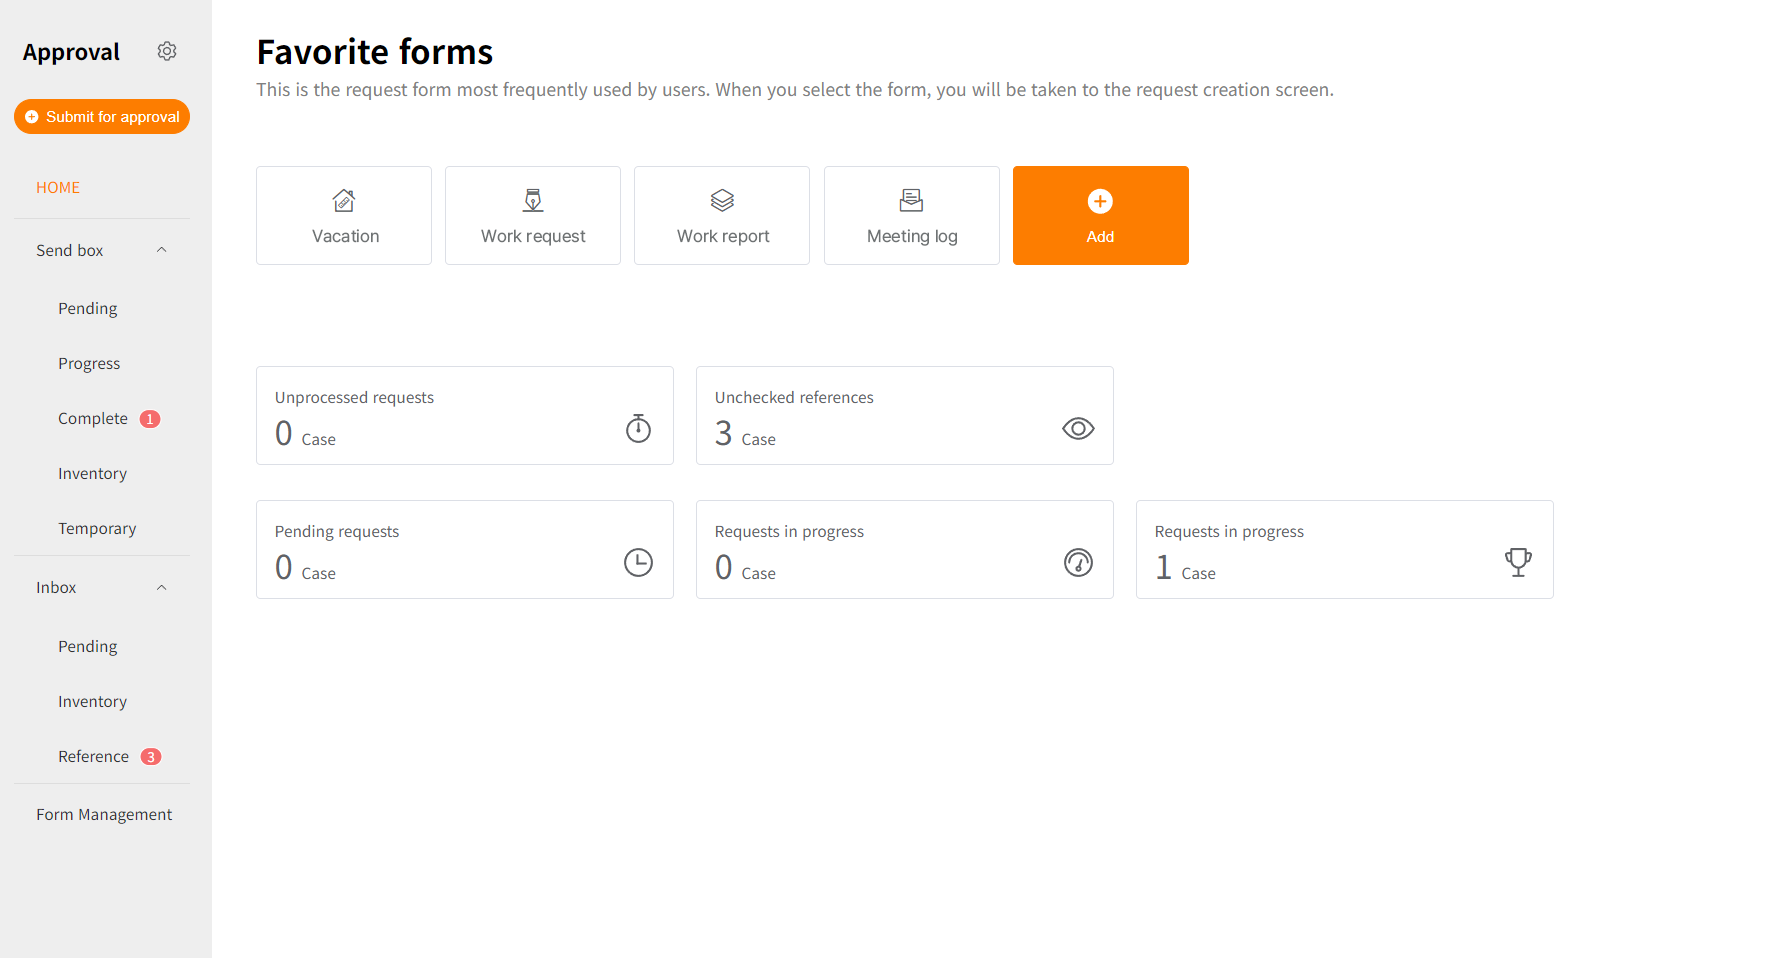
Form Management
You can create and use various forms for your company, institute, and more.
Administrators can easily create any new forms and share them with members. The shared forms can be easily added and used by office members.
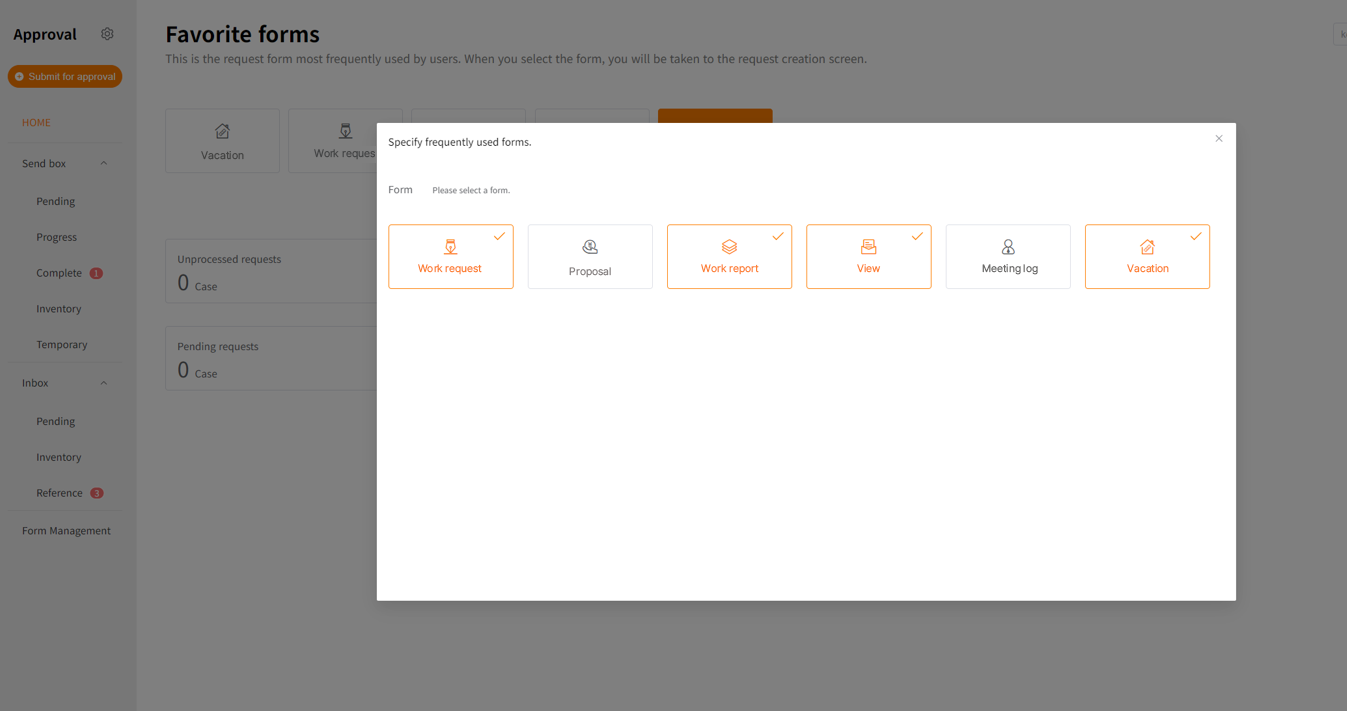
Favorite forms
You can add forms shared by administrators from frequently used forms to your favorite forms screen and make them with shortcut buttons.
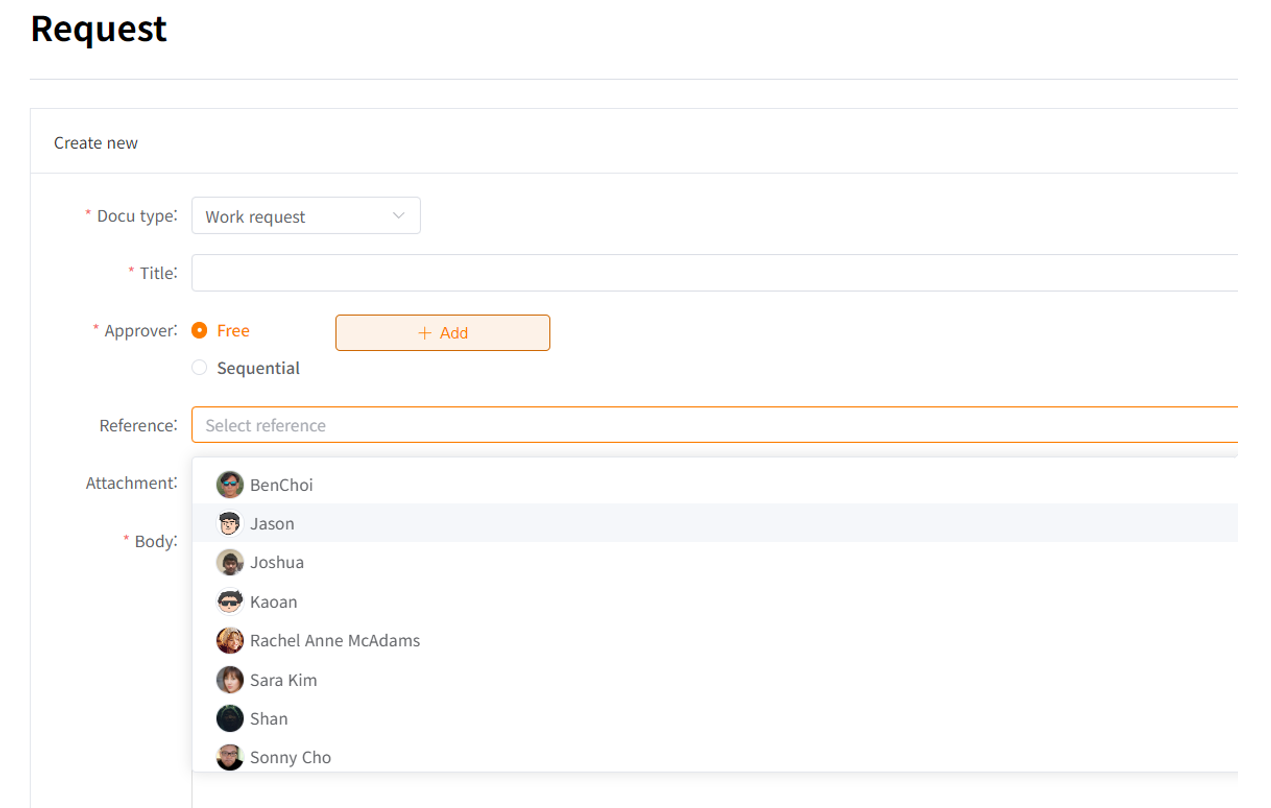
How to select approvers
Click the ‘Submit for approval’ button to select an added form or create a new one yourself. And then you can choose between free or sequential for the approval process.
Create frequently used approval lines
If you select 'Frequently used approval' in the upper left setting (wheel shape), you can enter a line name and save it by selecting approvers (free or sequential).
You can also share saved approval lines with office members.
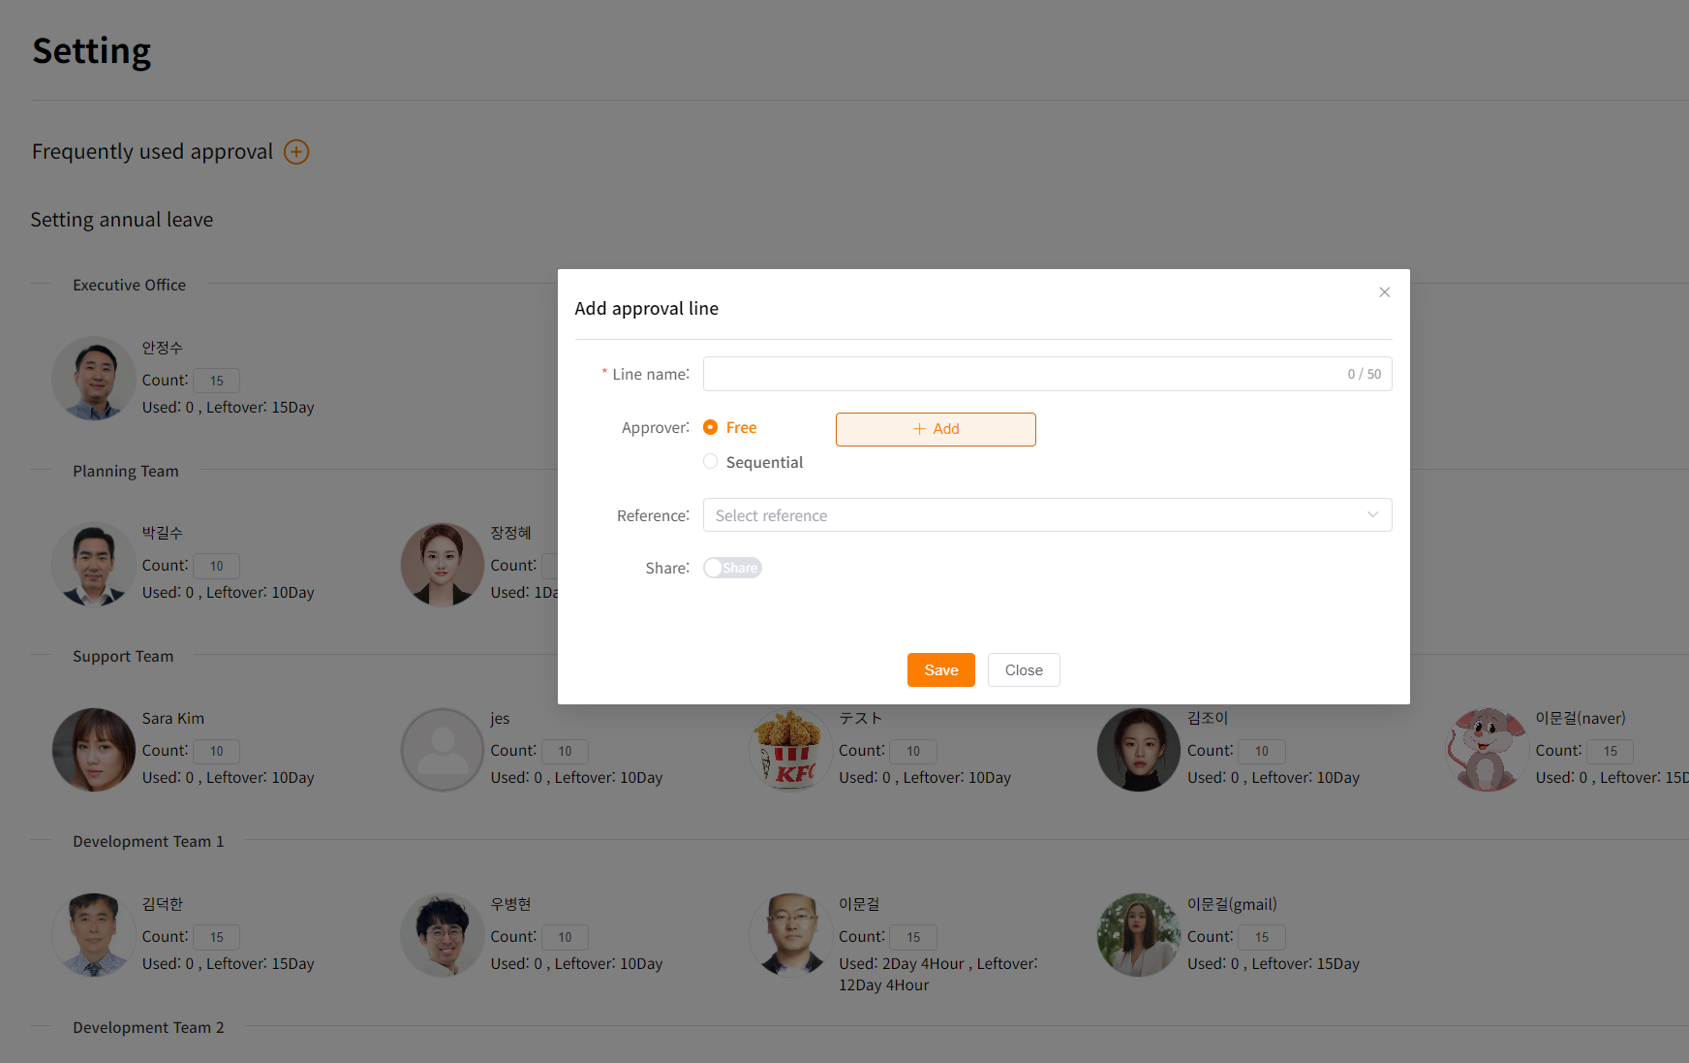
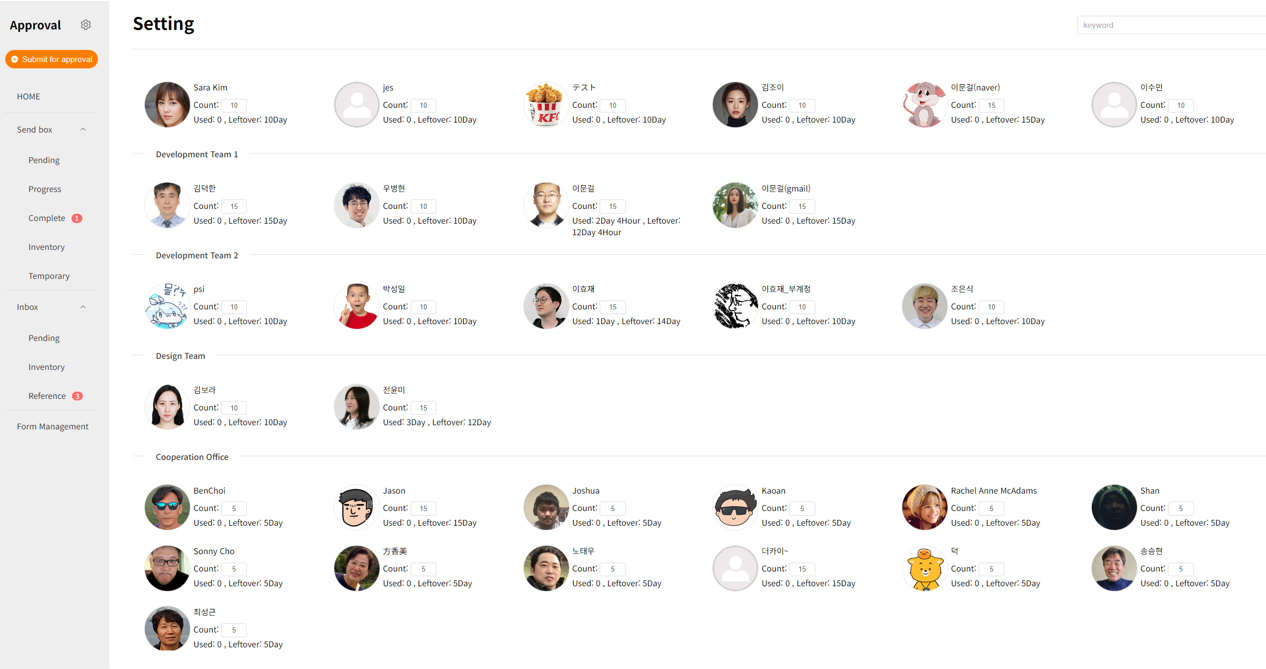
Set annual leave (administrator mode)
Users with administrative privileges can pre-set the count of annual leave for office members.
Administrators can directly fill in and reflect on members' holidays, and immediately view their current usage/residual annual leave.